
Trimming Dog Nails Safely at Home
A stress-free approach for you and your dog
Trimming your dog’s nails doesn’t have to be a battle. I’ll show you how to avoid the quick, tackle those tricky black nails and take it one small clip at a time — without upsetting your dog (or yourself!).
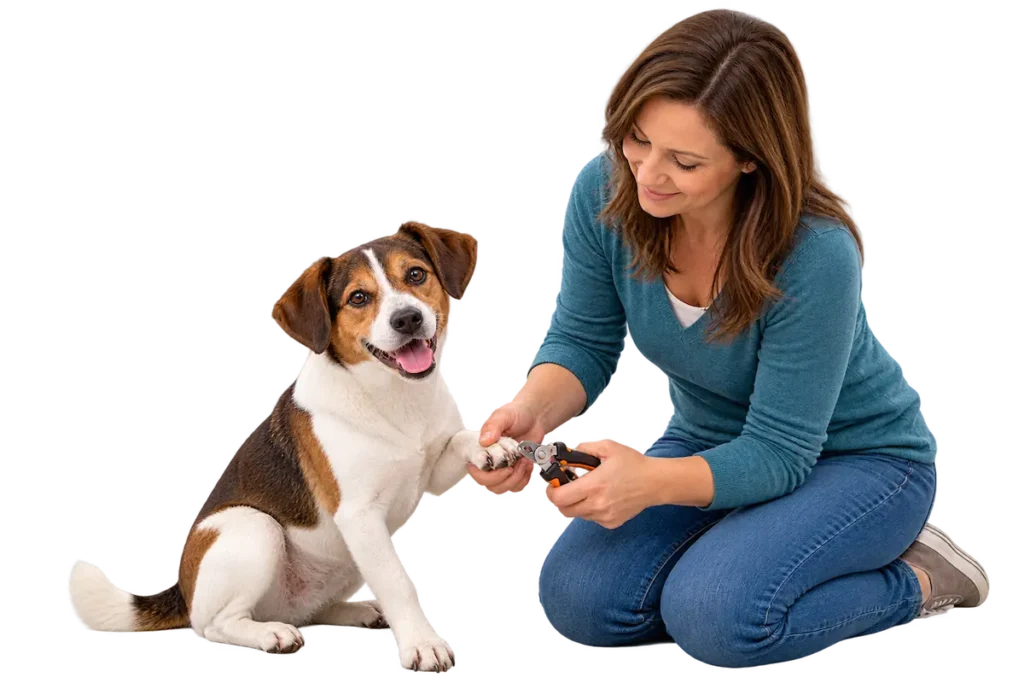
Before You Start Trimming Your Dog’s Nails
Get everything ready before you bring your dog over — especially if you have a wriggler! You don’t want to be hunting for the styptic powder halfway through the job.
You’ll need dog nail clippers or a nail grinder, a few treats and something to stop the bleeding just in case you accidentally nick the quick. If you’re using clippers, make sure they’re the right size for your dog and that the blades are sharp.
I’ve tried most types of dog nail clippers over the years and much prefer the plier style. But use whichever type you feel comfortable handling — being confident with the tool makes the whole process easier.
Have these ready
Dog nail clippers or grinder · Treats · Styptic powder · Dog nail file (optional)
Find the Quick Before You Start Cutting
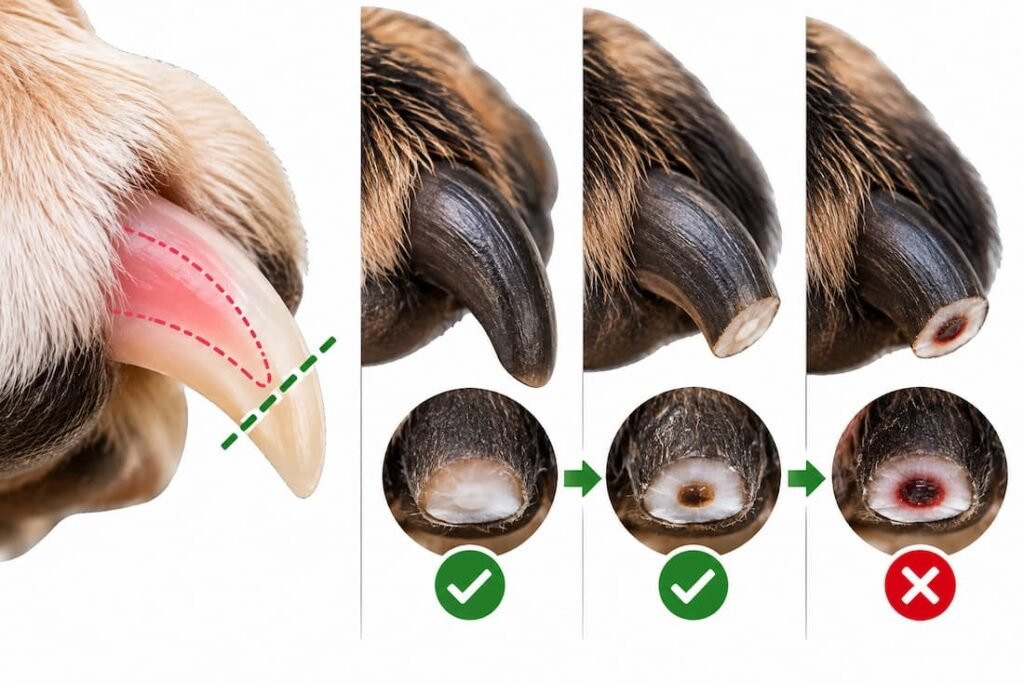
The part that makes most of us nervous about trimming dog nails is the quick. It contains blood vessels and nerves, so cutting into it hurts and causes bleeding. And yes, this is where the expression “cut to the quick” comes from!
If Your Dog Has White or Light-Colored Nails
You’re in luck because the quick is usually fairly easy to see. Look for the pink area running through the center of the nail and leave a small amount of nail between your cut and the end of the quick.
Don’t try to take off one big chunk. I find it much easier — and considerably less nerve-racking — to take several small clips instead.
What About Black Dog Nails?
After each small cut, look straight at the freshly cut end of the nail. As you get closer to the quick, you may notice the appearance of the center changing, with a darker spot becoming visible.
If you see a dark spot developing in the center, stop cutting that nail. And if you’re not sure what you’re seeing, stop anyway — it’s much better to leave the nail a little longer than risk cutting into the quick.
How to Trim Your Dog’s Nails Step by Step
Once you’ve found the quick — or know what to look for if your dog has black nails — you’re ready to start trimming.
1. Get Your Dog Comfortable
Choose a position that feels comfortable for both of you and gives you a good view of the nail you’re trimming.
Hold the paw gently but securely. If your dog is a wriggler, having someone else offer treats and reassurance while you concentrate on the nails can make life much easier.
Don’t forget the dewclaws if your dog has them. Because they don’t touch the ground, they won’t wear down naturally as your dog walks.
2. Trim a Tiny Bit at a Time
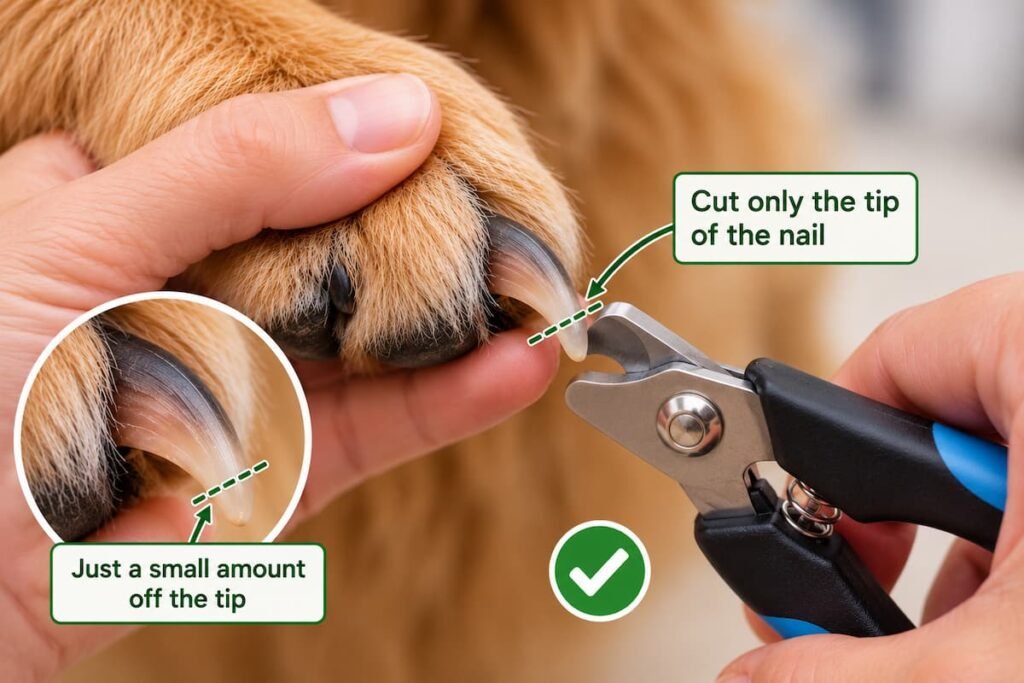
Position the clippers near the end of the nail and take off a small amount at a time.
I much prefer doing several little clips rather than trying to take the whole length off in one go. It puts less pressure on the nail and gives you much more control over how close you’re getting to the quick.
3. Check the Nail After Every Cut
Have another look at the cut surface before taking off any more.
With a light-colored nail, keep watching the position of the visible quick. With a black nail, use the changes in the cut surface we looked at above as your guide.
If you’re not sure whether it’s safe to take another clip, stop there. It’s always better to leave the nail slightly longer than risk cutting into the quick.
4. Don’t Force Your Dog to Finish
If your dog really hates having his nails trimmed, you don’t have to do all of them in one sitting.
Start with just one nail, reward him and call it a day. As he becomes more comfortable with having his paws handled and the clippers around, gradually work up to doing more.
There’s nothing wrong with taking your time — one peaceful nail is better than turning ten nails into a wrestling match!
5. Smooth Any Rough Edges
Once you’ve finished trimming, you can use a dog nail file to smooth any sharp or rough edges.
Then finish with a treat and plenty of praise, so your dog ends the session on a positive note.
What If You Accidentally Cut the Quick?
Even when you’re careful, accidents can happen. If you cut into the quick, your dog may yelp and the nail can bleed quite a bit — which can look alarming.
Stay calm and apply styptic powder directly to the end of the nail, using gentle pressure to help stop the bleeding.
No Styptic Powder?
If you don’t have styptic powder to hand, cornstarch can be used to help encourage clotting while you apply pressure.
Nicked the quick?
Stop trimming that nail.
Apply styptic powder and gentle pressure.
Keep your dog calm and discourage licking.
If the bleeding won’t stop, contact your veterinarian.
When to Call Your Vet
Get veterinary advice if the bleeding continues despite applying pressure and styptic powder, or if the nail is split, torn or badly damaged.
And don’t beat yourself up if you nick the quick. Most of us who have trimmed enough dog nails have done it at some point. Give your dog a little reassurance — and perhaps an extra treat — before deciding whether to continue another day.
How Often Should You Trim Your Dog’s Nails?
There isn’t one trimming schedule that suits every dog. How quickly your dog’s nails grow — and how much they wear down naturally — will depend on things like his activity level and the surfaces he regularly walks on.
Dogs that spend plenty of time walking on hard surfaces may naturally wear their nails down more than dogs that mostly walk on grass or softer ground.
The best approach is to check your dog’s nails regularly rather than relying on a fixed date on the calendar.
Why Keeping Your Dog’s Nails Short Matters
Overgrown nails aren’t just a cosmetic problem. If they become too long, they can be uncomfortable, affect the way your dog places his feet and make nails more vulnerable to snagging, splitting or breaking.
Don’t forget those dewclaws either. Because they don’t normally make contact with the ground, they need checking even if your dog naturally wears down his other nails.
What If the Nails Are Already Very Long?
If your dog’s nails have become overgrown, don’t try to get them back to an ideal length in one session.
The quick can extend farther along an overgrown nail, so removing too much at once risks cutting into it. Instead, take small amounts off regularly. Over time, careful, conservative trimming may allow you to gradually shorten the nails.
Not sure how far you can safely trim?
If the nails are severely overgrown, curled, damaged or you simply can’t tell where it’s safe to cut, ask your vet or an experienced professional groomer for help rather than guessing.
What If Your Dog Hates Having His Nails Trimmed?
Some dogs really do hate having their paws touched, never mind having someone approach them with a pair of clippers!
If that sounds like your dog, slow everything down. The aim at first isn’t to trim every nail — it’s simply to help him become more comfortable with the process.
Take It One Step at a Time
Start by gently handling his paws when you’re not planning to trim his nails. Touch his toes, hold a paw briefly, then reward him.
Once he’s comfortable with that, introduce the clippers or grinder without actually using them. Let him see and investigate the tool, and reward calm behavior.
Then progress gradually:
Hold the paw.
Touch the clipper to a nail without cutting.
Trim just one nail.
Reward him and finish the session on a good note.
Gradually increase the number of nails as he becomes more comfortable.
If one nail is all you manage today, that’s fine. You can always do another tomorrow.
Don’t turn it into a battle
If your dog is extremely frightened, struggling hard or trying to bite, stop. Forcing the issue can make future nail trims even harder — and increases the chance of either of you getting hurt. Ask your vet or a qualified groomer for help if you can’t trim his nails safely.
Finish on a Good Note
Whether you’ve trimmed one nail or all of them, finish with plenty of praise and a treat.
Keeping the experience as calm and positive as possible can make the next nail-trimming session easier. And if today didn’t go quite according to plan, don’t worry about finishing every nail. You can always come back to the rest another day.
Once you’re done, give your dog a treat and plenty of affection.
Then go and give yourself a treat — you deserve it!
More Everyday Dog Care Tips
Nail trimming is just one part of keeping your dog happy, healthy and comfortable. For more practical advice on everything from grooming to everyday care, visit my Dog Care Tips guide.
References:
Barnes, C., DVM & Barnette, C., DVM. How to Trim a Dog’s Nails at Home. VCA Animal Hospitals. Vca
How to Trim a Dog’s Nails at Home – VCA Animal Hospitals
Lindell, E., VMD, DACVB, Feyrecilde, M., LVT, VTS (Behavior), Horwitz, D., DVM, DACVB & Landsberg, G., DVM, DACVB, DECAWBM.
Successful Nail Trims: Training for Happy Handling – VCA Animal Hospitals